How to Clean a Keurig Mini

Making a barista-worthy coffee in the comforts of your home is easy with a Keurig Mini. It’s a small and convenient one-cup coffee machine that levels up your coffee game every single day.
To brew a tasty coffee every time and keep the coffee machine in great shape, it’s imperative to clean and descale it on a regular basis. You would want to clean mineral deposits to prevent the machine from glitching.
While making a cup of joe with Keurig mini is a breeze, cleaning it is just as easy.
Keep reading for a detailed guide to cleaning and descaling a Keurig Mini.
Why do you need to clean the Keurig Mini?
Regular cleaning and descaling of a Keurig Mini is essential to ensure they’re in working order. You wouldn’t want the coffee machine’s water reservoir to get icky when not cleaned for a long time. You also want to prevent grime and bacteria growth in the drip tray.
The proper routine cleaning and disinfecting of Keurig Mini can make your machine last longer and ensure you’re brewing fresh coffee every single time.
How to Clean a Keurig Mini?
Cleaning Supplies Needed:
- Dishwashing Liquid
- Distilled White Vinegar or Keurig descaling solution
- Water
Equipment:
- 1 Paper clip
- Sponge
- Coffee Cup
1. Turn Off and Unplug the Machine

When cleaning your Keurig, you should put safety first. Unplug the machine to minimize the risk of electrical shock.
2. Disassemble Components
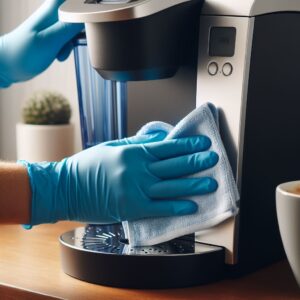
Hold the coffee machine in place and remove the drip tray by sliding it towards you. The drip tray is the part where you set your cup when brewing coffee. It’s designed to catch spills while brewing.
Wash the drip tray with soapy, warm water to clean it thoroughly. If there’s coffee residue, use an old toothbrush to scrub the grime away. Allow the drip tray to air dry.
Once the drip tray is clean, put it back into the Keurig Mini by pushing it firmly to pop it into place.
Then, use a damp microfiber cloth to wipe down the whole exterior of the machine.
If you use your coffee machine every day, clean the exterior and the drip tray at least once a week.
3. Clean the Interior
The water reservoir (water tank) and the cup area are the Keurig Mini’s interior.
Most Keurig Minis have removable water tanks. Gently pull the water tank straight up and off the machine. Wash it with warm water and soap. Rinse it thoroughly and allow it to air dry before putting it back in place.
Now, open the cup area and remove the cup holder with a firm but gentle force. To do this, lift the handle at the top of the front of the Keurig Mini. Pull the plastic holder out.
Pull the cup holder apart as 2 parts can be pulled apart – the cup piece at the top and the funnel at the bottom.
You will notice a small hole where the coffee drips at the bottom, and that part is called the needle. To clean, get a paper clip and poke the end of the hole to remove any build-up.
Then, rinse the cup holder with warm and clean water. Reassemble the 2 parts and pop it right back in the machine. It should be pretty easy to pop it back into place.
Close and open the cup holder part several times to make sure you inserted it correctly.
4. Descaling
Descaling the coffee machine is the final step in cleaning the Keurig Mini to clean it thoroughly. Descaling removes the mold build-up, if there is any.
To do this process best, run white vinegar or a descaling solution through it.
Descaling is recommended to be done at least once every 3 to 6 months, depending on how often you use the machine.
How To Descale a Keurig Mini?

Plug the machine to start descaling. Put a ceramic cup on the drip tray. Choose a cup that can hold 240 ml of liquid.
Fill the water tank with 2/3 plain white distilled vinegar and add water until it reaches the fill line. Close the top of the water tank. Lift the top handle, but don’t put a K-cup pod in. Wait for about 5 seconds before dropping the handle.
This will trick the machine that you have inserted a K-cup pod in, even though you did not.
Press the ‘brew’ button. The machine will begin heating and start dispensing the vinegar through the machine. It will drip into the coffee cup you inserted.
When the brew cycle is over, open the water reservoir again and put the same vinegar back. Be careful pouring the vinegar back because it’s hot now.
Push the ‘brew’ button again, but turn it off as soon as the vinegar begins dispensing. This will ensure the vinegar is sitting in all areas of the machine.
Wait for at least 30 minutes before starting the machine again. Open and close the cup holder and push the ‘brew’ button. Wait for the rest of the vinegar to dispense.
Pour the contents of the coffee cup down the sink.
Then, fill the water tank with clear water. Put a coffee cup on the drip tray and open and close the cup holder. Push the ‘brew’ button and wait for the water to be dispensed through the coffee machine.
Repeat this procedure two more times to get the vinegar taste out of the machine.
How Often Can We Clean and Descale a Keurig Mini?
How often you clean and descale your Keurig Mini depends on how often you use it.
If you’re using it daily, it’s a good idea to descale at least every 3 months and clean the water reservoir every 2 to 3 weeks.
FAQs
Is Vinegar Enough to Clean a Keurig Mini?
Vinegar works as well as a store-bought descaling solution. It’s also cost-effective.
What happens if you don’t clean Keurig?
When you don’t often clean your Keurig, there will be a mineral build-up. The gunky build-up can make your coffee taste funny and prevent Keurig from running optimally.
To ensure your Keurig is in perfect working condition and you brew fresh cups of coffee every time, give frequent attention to the coffee machine and clean and descale it thoroughly.
Conclusion
Having a Keurig Mini at home makes it easy to have a cup of good coffee whenever you want. You don’t have to run all the way to your favorite coffee shop to get your caffeine fix.
However, if you’re using your coffee machine often, it will lead to some gunk build-up over time.
Clean the coffee machine and descale at least every 3 to 6 months. Wipe down your coffee exterior and the drip tray with a soapy rag at least once a week to get rid of coffee stains, fingerprints, and other marks of grime.
Give attention to your reliable coffee machine to ensure it lasts long.